 Agent S2:
컴퓨터 사용 에이전트를 위한 구성적 일반-전문가 프레임워크
Agent S2:
컴퓨터 사용 에이전트를 위한 구성적 일반-전문가 프레임워크
🌐 [S2 블로그] 📄 [S2 논문] 🎥 [S2 동영상]
🌐 [S1 블로그] 📄 [S1 논문 (ICLR 2025)] 🎥 [S1 동영상]
🥳 업데이트
- 2025/04/01: OSWorld, WindowsAgentArena, AndroidWorld에서 새로운 SOTA 결과와 함께 Agent S2 논문 발표!
- 2025/03/12: 컴퓨터 사용 에이전트(CUA) 분야의 새로운 최첨단 기술인 gui-agents v0.2.0과 함께 Agent S2 출시, OpenAI의 CUA/Operator와 Anthropic의 Claude 3.7 Sonnet Computer-Use를 능가하는 성능!
- 2025/01/22: Agent S 논문이 ICLR 2025에 채택되었습니다!
- 2025/01/21: Linux 및 Windows 지원이 포함된 gui-agents 라이브러리 v0.1.2 출시!
- 2024/12/05: Mac, OSWorld 및 WindowsAgentArena에서 Agent-S를 쉽게 사용할 수 있는 gui-agents 라이브러리 v0.1.0 출시!
- 2024/10/10: Agent S 논문 및 코드베이스 공개!
목차
💡 소개
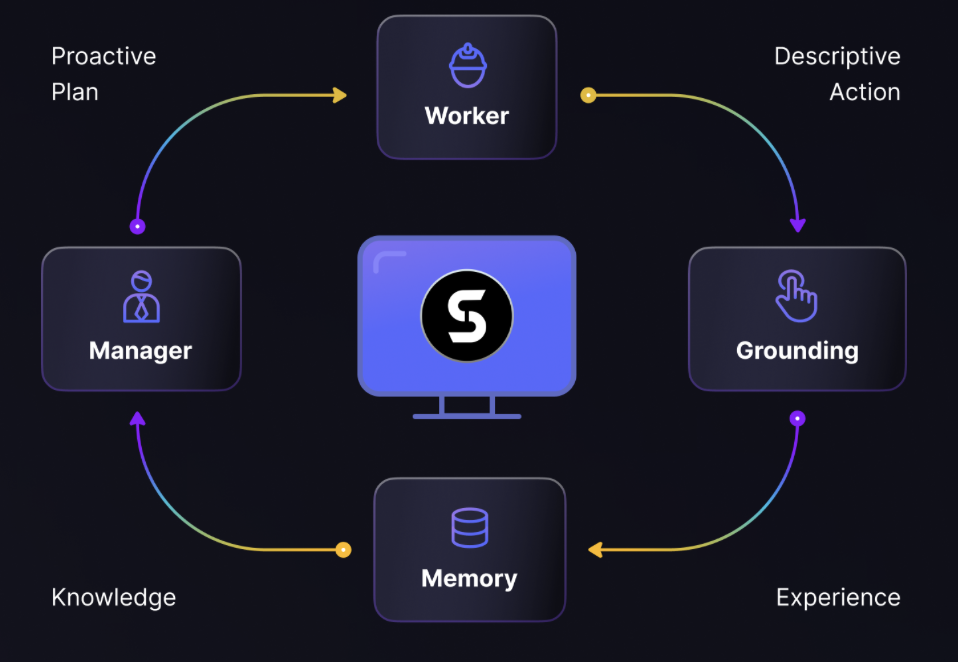
Agent S에 오신 것을 환영합니다. 이는 Agent-Computer Interface를 통해 컴퓨터와 자율적으로 상호 작용할 수 있도록 설계된 오픈소스 프레임워크입니다. 우리의 목표는 과거 경험을 학습하고 컴퓨터에서 복잡한 작업을 자율적으로 수행할 수 있는 지능형 GUI 에이전트를 구축하는 것입니다.
AI, 자동화 또는 최첨단 에이전트 기반 시스템에 기여하는 데 관심이 있으시다면, 여러분의 참여를 기대합니다!
🎯 현재 결과
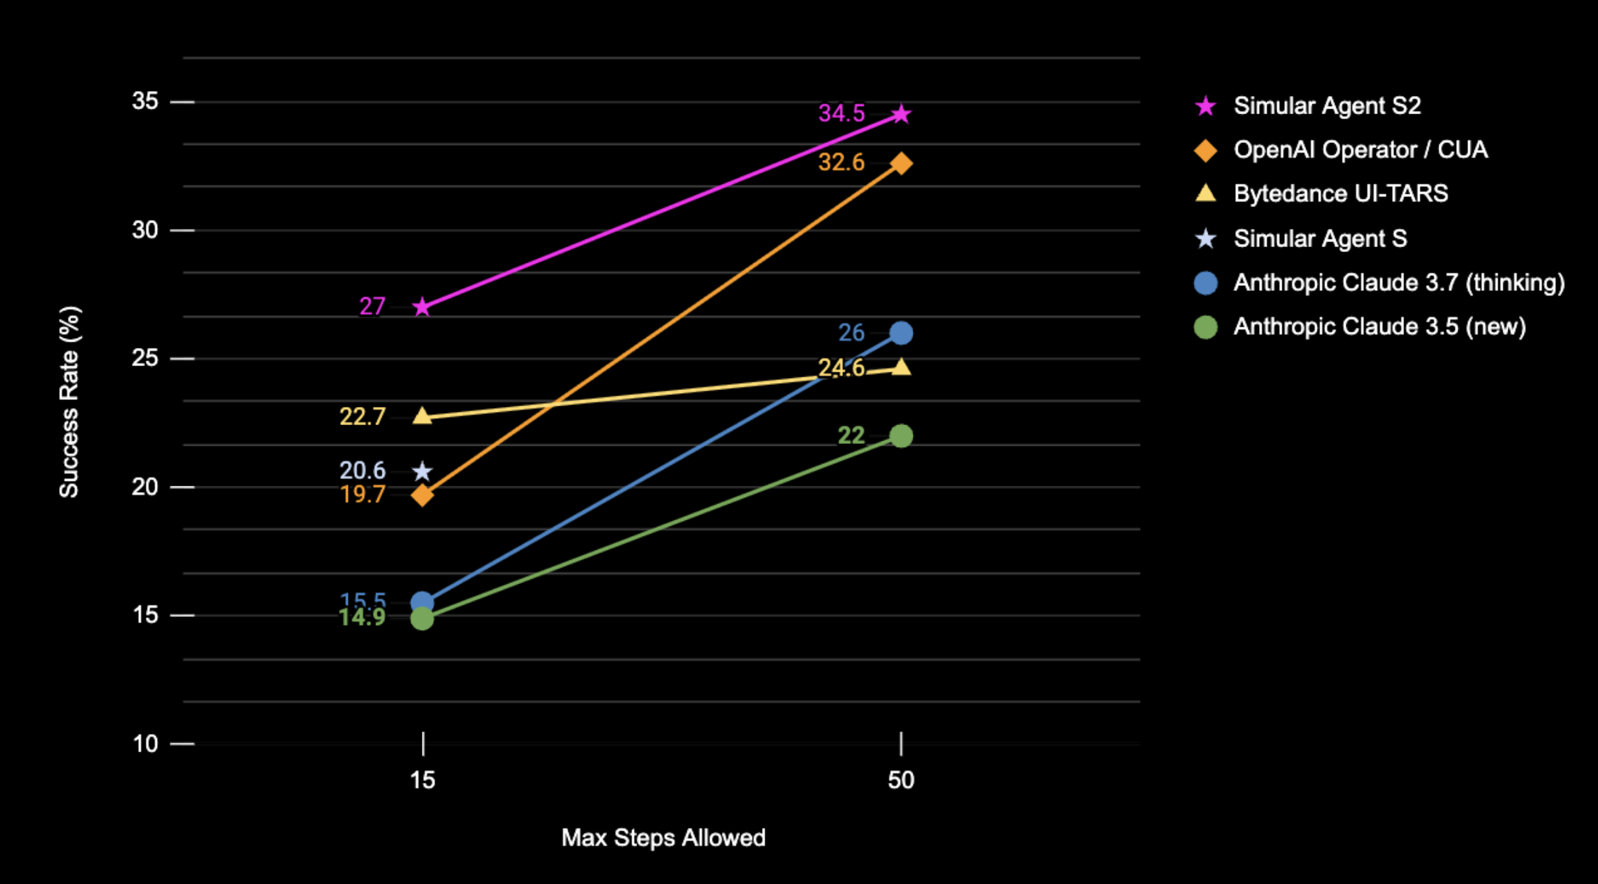
스크린샷 입력만 사용한 OSWorld 전체 테스트 세트에서 Agent S2의 성공률(%) 결과.
| 벤치마크 | Agent S2 | 이전 SOTA | Δ 향상 |
|---|---|---|---|
| OSWorld (15단계) | 27.0% | 22.7% (UI-TARS) | +4.3% |
| OSWorld (50단계) | 34.5% | 32.6% (OpenAI CUA) | +1.9% |
| WindowsAgentArena | 29.8% | 19.5% (NAVI) | +10.3% |
| AndroidWorld | 54.3% | 46.8% (UI-TARS) | +7.5% |
🛠️ 설치 및 설정
❗경고❗: Linux 머신에서 작업하는 경우,
conda환경을 생성하면pyatspi와 충돌할 수 있습니다. 현재로서는 이 문제에 대한 깔끔한 해결책이 없습니다.conda나 가상 환경을 사용하지 않고 설치를 진행하세요.
⚠️면책 조항⚠️: Agent S2의 전체 잠재력을 활용하기 위해 UI-TARS를 그라운딩 모델로 사용합니다(더 나은 성능을 위해 7B-DPO 또는 72B-DPO). 이 모델은 로컬에서 호스팅하거나 Hugging Face Inference Endpoints에서 사용할 수 있습니다. 우리의 코드는 Hugging Face Inference Endpoints를 지원합니다. Hugging Face Inference Endpoints에서 이 엔드포인트를 설정하고 쿼리하는 방법에 대한 자세한 정보를 확인하세요. 그러나 Agent S2를 실행하는 데 이 모델이 반드시 필요한 것은 아니며, Claude와 같은 API 기반 모델을 시각적 그라운딩에 사용할 수 있습니다.
패키지 설치:
pip install gui-agents
LLM API 키와 기타 환경 변수를 설정합니다. .bashrc(Linux) 또는 .zshrc(MacOS) 파일에 다음 줄을 추가하여 설정할 수 있습니다.
export OPENAI_API_KEY=<YOUR_API_KEY>
export ANTHROPIC_API_KEY=<YOUR_ANTHROPIC_API_KEY>
export HF_TOKEN=<YOUR_HF_TOKEN>
또는 Python 스크립트에서 환경 변수를 설정할 수 있습니다:
import os
os.environ["OPENAI_API_KEY"] = "<YOUR_API_KEY>"
Azure OpenAI, Anthropic, Gemini, Open Router 및 vLLM 추론도 지원합니다. 자세한 내용은 models.md를 참조하세요.
Perplexica를 사용한 웹 검색 설정
Agent S는 웹 지식 검색과 함께 사용할 때 가장 효과적입니다. 이 기능을 활성화하려면 Perplexica를 설정해야 합니다:
-
Docker Desktop이 시스템에 설치되어 실행 중인지 확인하세요.
-
프로젝트 파일이 포함된 디렉터리로 이동합니다.
cd Perplexica git submodule update --init -
sample.config.toml파일을config.toml로 이름을 변경합니다. Docker 설정의 경우 다음 필드만 채우면 됩니다:-
OPENAI: OpenAI API 키. OpenAI 모델을 사용하려는 경우에만 필요합니다. -
OLLAMA: Ollama API URL.http://host.docker.internal:PORT_NUMBER형식으로 입력해야 합니다. Ollama를 포트 11434에 설치한 경우http://host.docker.internal:11434를 사용합니다. 다른 포트의 경우 적절히 조정하세요. OpenAI 대신 Ollama 모델을 사용하려는 경우 필요합니다. -
GROQ: Groq API 키. Groq의 호스팅된 모델을 사용하려는 경우에만 필요합니다. -
ANTHROPIC: Anthropic API 키. Anthropic 모델을 사용하려는 경우에만 필요합니다.참고: 설정 후 Perplexica의 설정 대화상자에서 이 값을 변경할 수 있습니다.
-
SIMILARITY_MEASURE: 사용할 유사도 측정 방법(기본값이 채워져 있습니다; 확실하지 않은 경우 그대로 두세요.)
-
-
docker-compose.yaml파일이 포함된 디렉터리에 있는지 확인하고 다음을 실행합니다:docker compose up -d -
docker-compose.yaml파일에서 찾은 포트를 사용하여 Perplexica URL을 내보냅니다.app/ports아래에3000:3000이 표시됩니다. 포트는 왼쪽 숫자입니다(이 경우 3000).export PERPLEXICA_URL=http://localhost:{port}/api/search -
Agent S의 구현에는 Perplexica API가 통합되어 있어 검색 엔진 기능을 제공하며, 더 편리하고 반응성이 뛰어난 사용자 경험을 가능하게 합니다. API를 사용자 설정 및 특정 요구 사항에 맞게 조정하려면
agent_s/query_perplexica.py에서 요청 매개변수의 URL과 메시지를 수정할 수 있습니다. Perplexica API 구성에 대한 포괄적인 가이드는 Perplexica Search API Documentation을 참조하세요. 더 자세한 설정 및 사용 가이드는 Perplexica Repository를 참조하세요.
❗경고❗: 에이전트는 컴퓨터를 제어하기 위해 직접 Python 코드를 실행합니다. 주의해서 사용하세요.
🚀 사용 방법
참고: 최적의 구성은 확장된 사고와 UI-TARS-72B-DPO가 포함된 Claude 3.7을 사용합니다. 리소스 제약으로 인해 UI-TARS-72B-DPO를 실행할 수 없는 경우, 성능 저하가 최소화된 더 가벼운 대안으로 UI-TARS-7B-DPO를 사용할 수 있습니다.
CLI
특정 모델로 Agent S2 실행(기본값은 gpt-4o):
agent_s2 \
  --provider "anthropic" \
  --model "claude-3-7-sonnet-20250219" \
  --grounding_model_provider "anthropic" \
  --grounding_model "claude-3-7-sonnet-20250219" \
또는 사용자 정의 엔드포인트 사용:
agent_s2 \
  --provider "anthropic" \
  --model "claude-3-7-sonnet-20250219" \
  --endpoint_provider "huggingface" \
  --endpoint_url "<endpoint_url>/v1/"
주요 모델 설정
--provider,--model- 목적: 주요 생성 모델 지정
- 지원: models.md의 모든 모델 제공자
- 기본값:
--provider "anthropic" --model "claude-3-7-sonnet-20250219"
--model_url,--model_api_key- 목적: 주요 생성 모델에 대한 사용자 정의 엔드포인트 및 API 키 지정
- 참고: 선택 사항입니다. 지정하지 않으면
gui-agents는 URL과 API 키에 대해 환경 변수를 기본값으로 사용합니다. - 지원: models.md의 모든 모델 제공자
- 기본값: 없음
그라운딩 구성 옵션
구성 1 또는 구성 2 중 하나를 사용할 수 있습니다:
(기본) 구성 1: API 기반 모델
--grounding_model_provider,--grounding_model- 목적: 시각적 그라운딩(좌표 예측)을 위한 모델 지정
- 지원: models.md의 모든 모델 제공자
- 기본값:
--grounding_model_provider "anthropic" --grounding_model "claude-3-7-sonnet-20250219"
- ❗중요❗
--grounding_model_resize_width- 목적: 일부 API 제공자는 이미지를 자동으로 크기 조정합니다. 따라서 생성된 (x, y)는 원본 이미지 크기가 아닌 크기 조정된 이미지 크기에 상대적입니다.
- 지원: Anthropic 크기 조정
- 팁: 매우 간단한 쿼리에 대해서도 그라운딩이 정확하지 않은 경우, 머신의 해상도에 맞는 크기 조정 너비가 올바른지 다시 확인하세요.
- 기본값:
--grounding_model_resize_width 1366(Anthropic)
구성 2: 사용자 정의 엔드포인트
-
--endpoint_provider- 목적: 엔드포인트 제공자 지정
- 지원: HuggingFace TGI, vLLM, Open Router
- 기본값: 없음
-
--endpoint_url- 목적: 사용자 정의 엔드포인트 URL
- 기본값: 없음
-
--endpoint_api_key- 목적: 사용자 정의 엔드포인트 API 키
- 참고: 선택 사항입니다. 지정하지 않으면
gui-agents는 API 키에 대해 환경 변수를 기본값으로 사용합니다. - 기본값: 없음
참고: 구성 2가 구성 1보다 우선합니다.
이렇게 하면 사용자 쿼리 프롬프트가 표시되며, 여기서 쿼리를 입력하고 Agent S2와 상호 작용할 수 있습니다. models.md의 지원 모델 목록에서 모든 모델을 사용할 수 있습니다.
gui_agents SDK
먼저 필요한 모듈을 가져옵니다. AgentS2는 Agent S2의 주요 에이전트 클래스입니다. OSWorldACI는 에이전트 작업을 실행 가능한 Python 코드로 변환하는 그라운딩 에이전트입니다.
import pyautogui
import io
from gui_agents.s2.agents.agent_s import AgentS2
from gui_agents.s2.agents.grounding import OSWorldACI

# Load in your API keys.
from dotenv import load_dotenv
load_dotenv()

current_platform = "linux"  # "darwin", "windows"
다음으로 엔진 매개변수를 정의합니다. engine_params는 주요 에이전트에 사용되며, engine_params_for_grounding은 그라운딩에 사용됩니다. engine_params_for_grounding의 경우 Claude, GPT 시리즈 및 Hugging Face Inference Endpoints를 지원합니다.
engine_params = {
  "engine_type": provider,
  "model": model,
  "base_url": model_url,     # Optional
  "api_key": model_api_key,  # Optional
}

# Grounding Configuration 1: Load the grounding engine from an API based model
grounding_model_provider = "<your_grounding_model_provider>"
grounding_model = "<your_grounding_model>"
grounding_model_resize_width = 1366
screen_width, screen_height = pyautogui.size()

engine_params_for_grounding = {
  "engine_type": grounding_model_provider,
  "model": grounding_model,
  "grounding_width": grounding_model_resize_width,
  "grounding_height": screen_height
  * grounding_model_resize_width
  / screen_width,
}

# Grounding Configuration 2: Load the grounding engine from a HuggingFace TGI endpoint
endpoint_provider = "<your_endpoint_provider>"
endpoint_url = "<your_endpoint_url>"
endpoint_api_key = "<your_api_key>"

engine_params_for_grounding = {
  "engine_type": endpoint_provider,
  "base_url": endpoint_url,
  "api_key": endpoint_api_key,  # Optional
}
그런 다음 그라운딩 에이전트와 Agent S2를 정의합니다.
grounding_agent = OSWorldACI(
    platform=current_platform,
    engine_params_for_generation=engine_params,
    engine_params_for_grounding=engine_params_for_grounding
)

agent = AgentS2(
  engine_params,
  grounding_agent,
  platform=current_platform,
  action_space="pyautogui",
  observation_type="screenshot",
  search_engine="Perplexica",  # Assuming you have set up Perplexica.
  embedding_engine_type="openai"  # Supports "gemini", "openai"
)
마지막으로 에이전트에 쿼리를 보냅니다!
# Get screenshot.
screenshot = pyautogui.screenshot()
buffered = io.BytesIO()
screenshot.save(buffered, format="PNG")
screenshot_bytes = buffered.getvalue()

obs = {
  "screenshot": screenshot_bytes,
}

instruction = "Close VS Code"
info, action = agent.predict(instruction=instruction, observation=obs)

exec(action[0])
추론 루프 작동 방식에 대한 자세한 내용은 gui_agents/s2/cli_app.py를 참조하세요.
지식 베이스 다운로드
Agent S2는 추론 중에 새로운 지식으로 지속적으로 업데이트되는 지식 베이스를 사용합니다. 지식 베이스는 AgentS2 초기화 시 처음 다운로드됩니다. 지식 베이스는 GitHub Releases의 자산으로 저장됩니다. AgentS2 초기화는 지정된 플랫폼 및 에이전트 버전(예: s1, s2)에 대한 지식 베이스만 다운로드합니다. 프로그래밍 방식으로 지식 베이스를 다운로드하려면 다음 코드를 사용할 수 있습니다:
download_kb_data(
    version="s2",
    release_tag="v0.2.2",
    download_dir="kb_data",
    platform="linux"  # "darwin", "windows"
)
이렇게 하면 릴리스 태그 v0.2.2에서 Linux용 Agent S2의 지식 베이스가 kb_data 디렉터리에 다운로드됩니다. 지식 베이스가 포함된 릴리스 태그 또는 GitHub Releases를 참조하세요.
OSWorld
OSWorld에서 Agent S2를 배포하려면 OSWorld 배포 지침을 따르세요.
💬 인용
이 코드베이스가 유용하다고 생각되면 다음을 인용해 주세요.
@misc{Agent-S2,
      title={Agent S2: A Compositional Generalist-Specialist Framework for Computer Use Agents},
      author={Saaket Agashe and Kyle Wong and Vincent Tu and Jiachen Yang and Ang Li and Xin Eric Wang},
      year={2025},
      eprint={2504.00906},
      archivePrefix={arXiv},
      primaryClass={cs.AI},
      url={https://arxiv.org/abs/2504.00906},
}
@inproceedings{Agent-S,
    title={{Agent S: An Open Agentic Framework that Uses Computers Like a Human}},
    author={Saaket Agashe and Jiuzhou Han and Shuyu Gan and Jiachen Yang and Ang Li and Xin Eric Wang},
    booktitle={International Conference on Learning Representations (ICLR)},
    year={2025},
    url={https://arxiv.org/abs/2410.08164}
}